How to Augment Spaces
Archi VR allows you to augment your captured spaces in a variety of ways. Add custom markers like arrows and text using the built-in user-generated content tools. Import 3D models from downloadable catalogs. Make your room scan even more detailed by marking the location of interiors and equipment such as furniture or machinery. And finally, take it even further with app extensions for AR services, workflows, and curated AR presentations.
Content
- Create custom, user-generated AR Content
- Capture Interiors and Equipments
- Use Catalog Objects
- Create Image or Video Panel
- Modify AR Items
- Enhance Items with Web Link, Photo, Text or Audio Messages
- View Augmented Spaces in AR, 3D, and 2D
- Add Extensions to the ARchi VR App
- Use AR Services
- Integrate with Workflows
- Explore Curated AR Presentations
- Develop App Extensions
An augmented room
Once a room is captured, users can easily add their own virtual content right from their mobile devices. This allows users to create persistent, location-specific information that the user or other collaborators can revisit or edit later.
Add Spot Marker
- Mark a single spot on the floor or a wall
- Press the "Done" button
- Select the 3D marker type in the popup menu
- Add an optional text label
| Icon | Type | AR View |
|---|---|---|

|
Information |

|

|
Question |

|

|
Warning |
|

|
Task |

|

|
Open Task |
|

|
Done Task |
|

|
Text only without 3D icon |

|
Types of spot markers
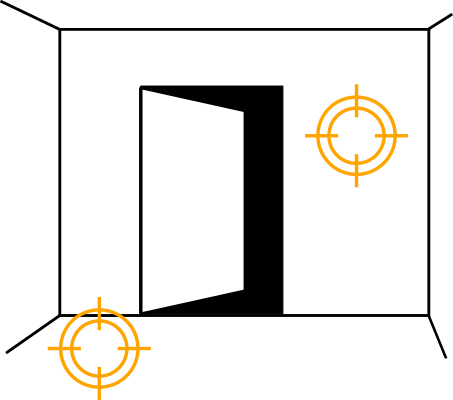
Mark a spot at floor or wall
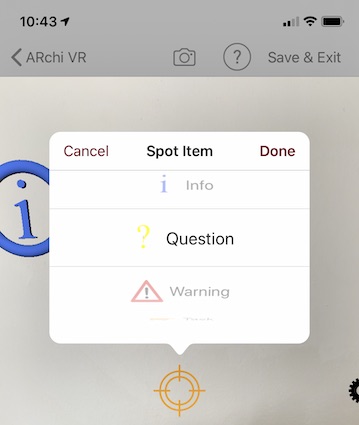
Select a spot marker type
Add Text Panel
- Mark a single spot on the floor or a wall
- Press the "Done" button
- Select the panel type in the popup menu
- A rich text editor opens in a popup window
- Tap on the text to launch the keyboard
- Use the buttons at the top of the keyboard to format text
- Press "Save Text"
| Icon | Type | AR View |
|---|---|---|

|
Panel |
|

|
Panel (inv) |
|
Two types of text panels: normal and inverse
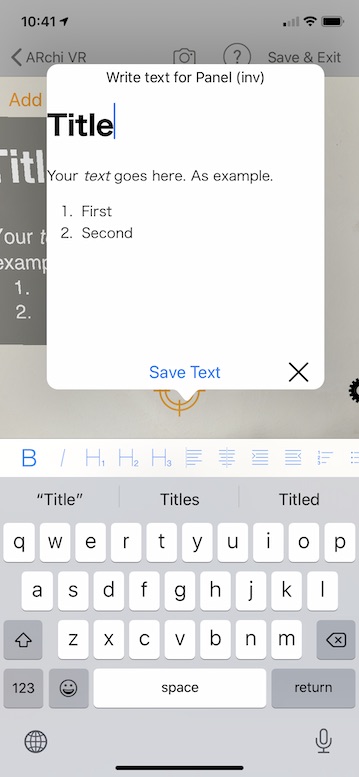
Edit rich text of panel
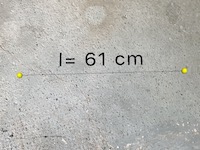
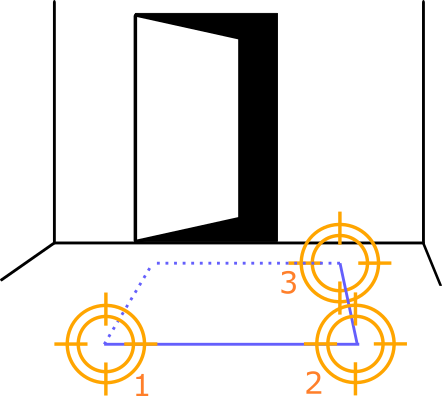
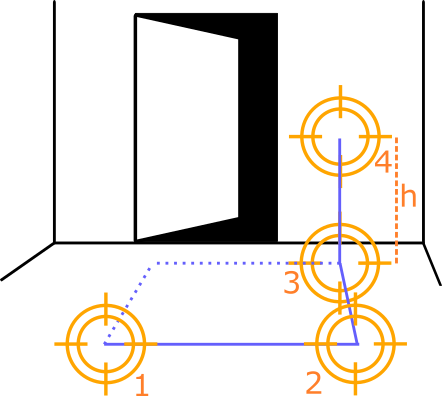
Add Route Item
- Mark two spots as a from-to route either on the floor or at a wall
- Press the "Done" button
- Select the route type in the popup menu
- Add an optional text label (for Distance the label is automatically generated)
| Icon | Type | AR View |
|---|---|---|

|
Distance |
|

|
Pointer |
|

|
Direction Arrow |
|

|
Radius |
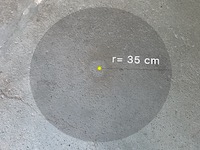
|
Types of route items
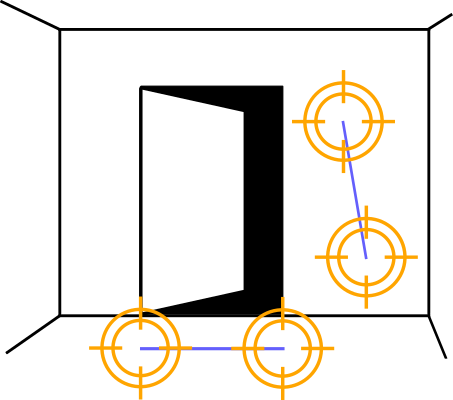
Capture route on floor or wall

Select route type
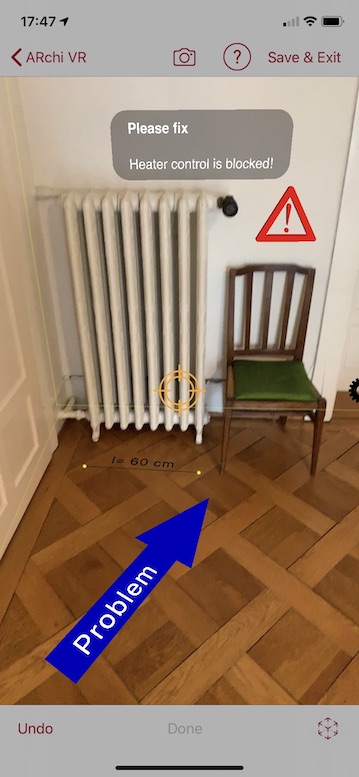
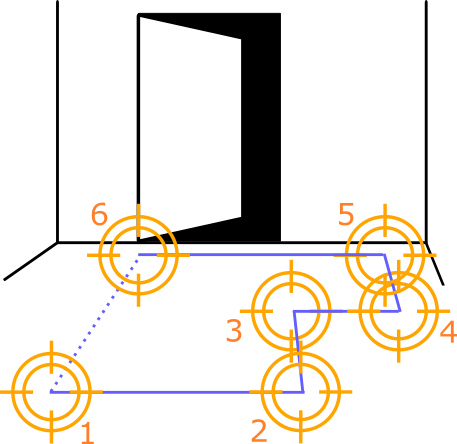
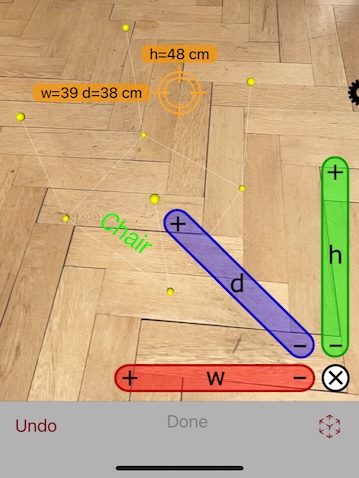
Add Zone
- Capture the shape of the area you want to add by marking its corners.
- Marked corners are visualized as yellow dots while capturing.
- The distance between marked corners and the angle to previous edge are displayed as overlay text.
- Use the "Undo" button to delete last marked corner if it is incorrect.
- If the zone has a rectangular shape, then mark the width and height of the area with 3 clicks and press the "Done" button. The missing corner of the square will be generated automatically.
- If the zone is not rectangular, mark all corners, but do not reselect the first corner to close the shape. Simply press “Done”, and the path will be closed automatically.
- Select the zone type in the popup menu
- Depending on the selected zone type, a corresponding color is used for visualizing the area.
- Zone types "Named Area" and "Damaged Area" can have an optional text label.
| Color | Type | |
|---|---|---|
| Carpet | ||
| Keep Free | ||
| Entry | ||
| Gangway | ||
| Lane | ||
| Lawn | ||
| Pool | ||
| Parking | ||
| Damaged Area | ||
| Named Area | ||

|
Object Footprint | |

|
undefined |
Color-coding and types of zones
Capture a square zone

Interactive capturing of zone
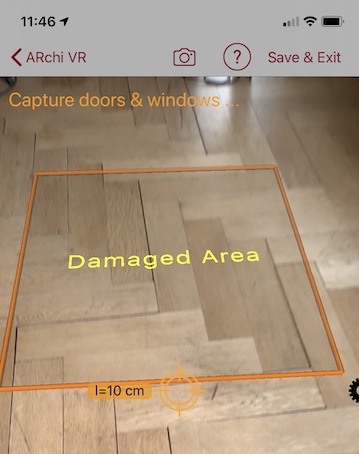
Visualization of zone in AR
Capture a free-form zone
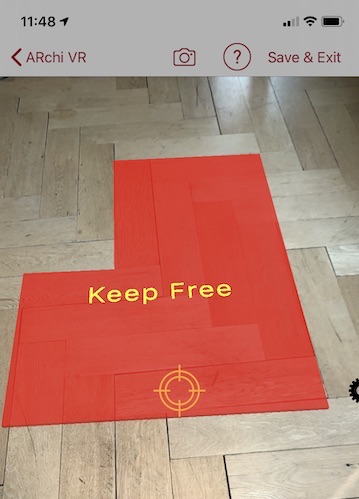
Visualization of a L-shaped zone
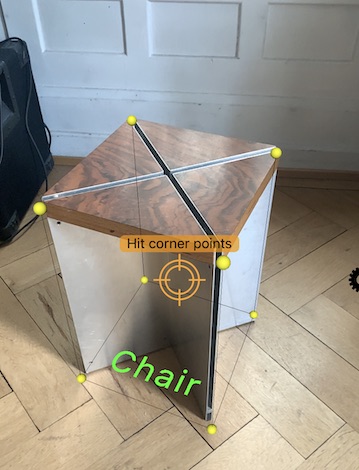
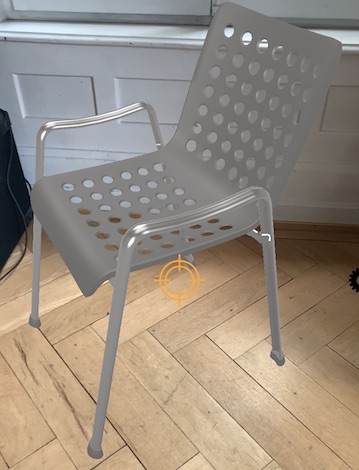
Capture a free-standing Object
- Mark the object's footprint on the floor similar to capturing a zone.
- Instead of "Done" press the "Set Height" button.
- A height ruler appears going upwards from last corner.
- Height ruler shows a 10 cm raster and displays height from floor in cm.
- Mark height of object by tapping screen when top edge is in finder sight.
- ARchi VR tries to automatically determine the object's category and type.
- If the automatic recognition is unavailable or incorrect, set it manually in the popup menu.
Capture an Object standing at Wall
Furniture against a wall can be captured a couple different ways:- Mark the object diagonal (e.g., from bottom-front-right at the floor to the top-back-left at the wall.
- Mark the object's front edge at the floor and then define the height as marked corner at the wall.
| Icon | Type | AR View |
|---|---|---|

|
Real 3D Object A real object captured by its bounding box (defined by the object's footprint area and its height). |
|
|
|
Virtual 3D Catalog Item A virtual object added from a 3D catalog. See Use Catalog Objects |
|
Capture bounding-box of real object and place virtual 3D object
Capture a free-standing object
Object Categories
- Building (immobile element)
- Equipment (stationary device)
- Interior (furniture)
- Commodity
- 3D Object (catalog element)
- Any (unknown category)
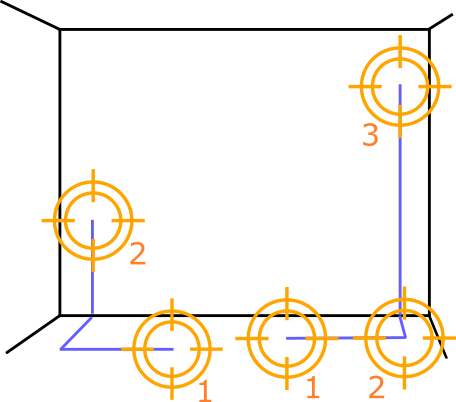
Capture object at wall
Use Catalog Objects
Add Catalog Element
- ARchi VR provides a default catalog with some some commonly used 3D objects.
- You may download additional catalogs via App extensions. See Add Extensions to the ARchi VR App.
- In the AR view tap the button on the bottom right to open the catalog selector.
- The catalog selector can also be directly accessed from the main screen.
- Filter the catalog by selecting an object category and/or by a search string.
- Tap on a catalog element. This will then be downloaded and virtually placed in the AR view infront of the user.
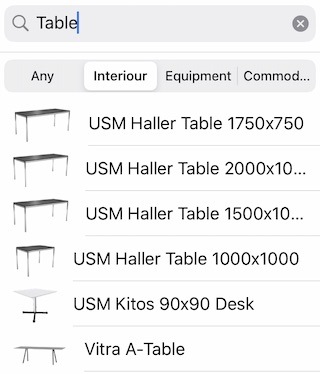
Filter and search in catalog
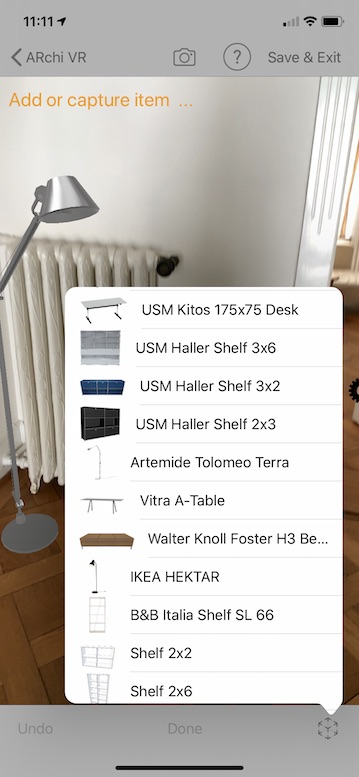
Catalog of 3D models
Create Image or Video Panel
- At a wall create a window that you will convert to an image or video panel
- The top border and the width of the window will be taken as defined, the aspect ratio of the selected image or video will automatically calculate the correct height of the panel
- Choose one of the following actions in the popup menu on top of the window
- A picture selected from the local photo roll is added as file attachment to the space
- If you enter a video URL, it will start automatically and will play repeatingly
- Use gestures to position image or video panel (see next chapter)
| Icon | Action |
|---|---|

|
Picture from local photo roll Select a picture from photo roll on your local device |

|
Remote image or video Enter a Web URL to an image or video |
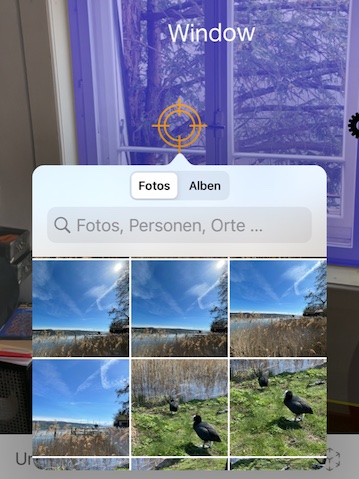
Select image from photo roll
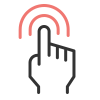
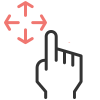
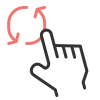
Act on an AR Item with Gestures
| Gesture | Action | |
|---|---|---|

|
Single Finger Tap | Trigger link if item is enhanced and pulsating. |
|
Single Finger Long Touch | Touch long to open a popup window for options. |
|
Single Finger Dragging | Touch and drag an item to change position on the floor. |

|
Two Finger Up&Down Dragging | Touch and drag an item to change its height from the floor. |
|
Two Finger Rotating | Touch and rotate an item around its up axis. |
Touch gestures to modify AR items
Edit an AR Item
- Use a long touch to open a selection popup menu by pressing on an AR item longer than a second
- Choose an action in the popup menu
| Icon | Action |
|---|---|

|
Billboard On|Off Always orient towards user (only for Spot and Panel items) |

|
lock disable moving and rotating the item |

|
unlock enable moving and rotating the item |

|
delete |

Popup menu to edit AR item
Control Position and Size with Touch Pad Overlay
- Use a long touch to open a selection popup menu by pressing on an AR item longer than a second
- Choose position or resize action in the popup menu
- Drag on corresponding area within overlay to control selected AR item
- Changes are relative to the local coordinate system of the item
- Press the close button in the pad to remove the overlay
| Icon | Action |
|---|---|

|
position open XYZ pad as overlay control |

|
resize open WxHxD pad as overlay control (to resize width, heigth, and depth) |

XYZ pad control
WxHxD pad control
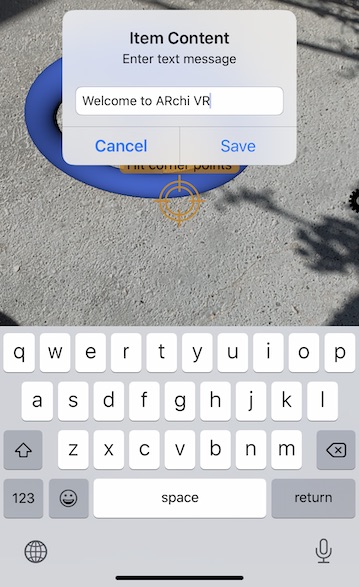
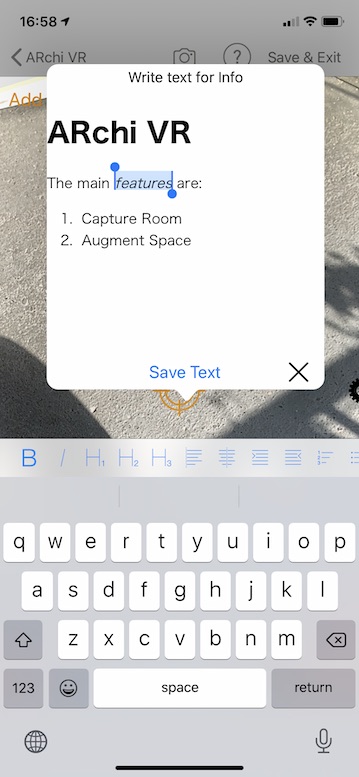
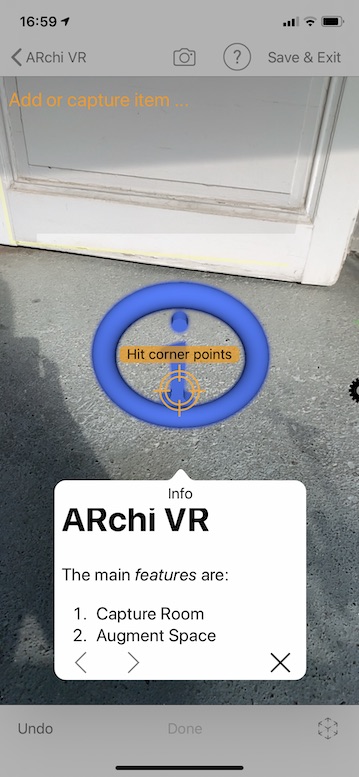
- Use a long touch to open a selection popup menu by pressing on an AR item longer than a second.
- Choose an action in the popup menu as listed below.
- A specific editor will open in a popup window.
- After an item is enhanced by saving the editor's content it will pulsate to depict that it is now interactive.
- By a single finger tap on a pulsating item its content will be presented in a popup view to the user.
| Icon | Action | Editor | View |
|---|---|---|---|

|
Add Message Add a simple single line text message. |
|

|

|
Add Text Add a rich-formated multi-line text. |
|
|

|
Add Photo Add an image from your Photo roll. |
|
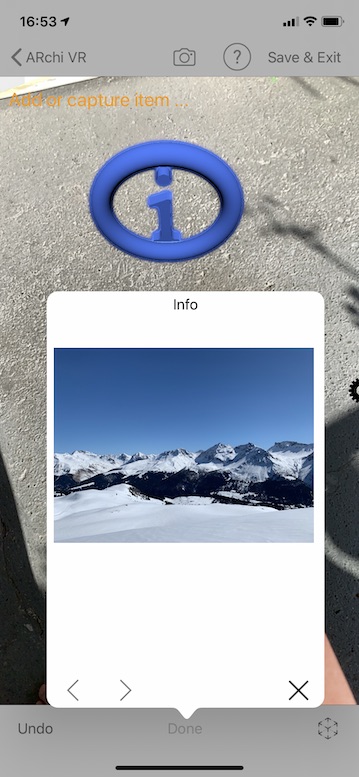
|

|
Add Voice Record an audio message. |
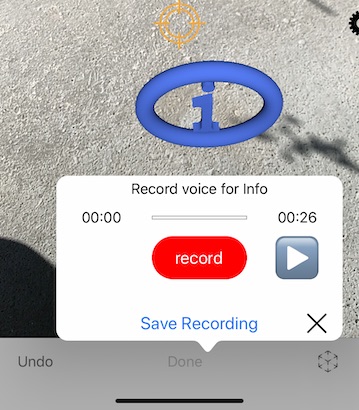
|
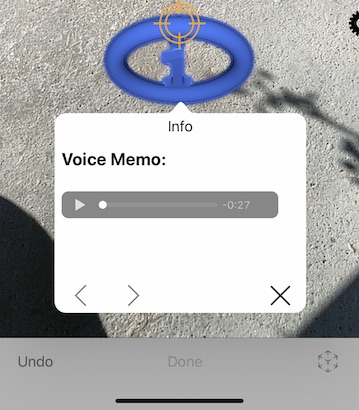
|

|
Add URL Select a Web page that will be linked to the AR item. |
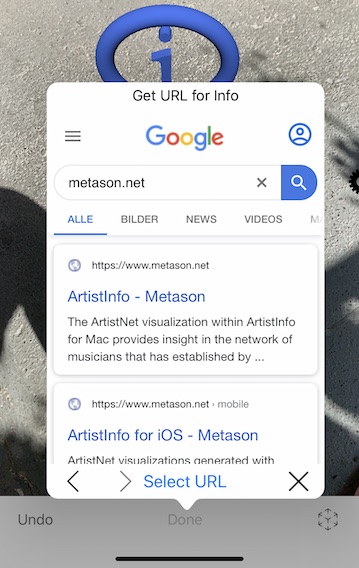
|
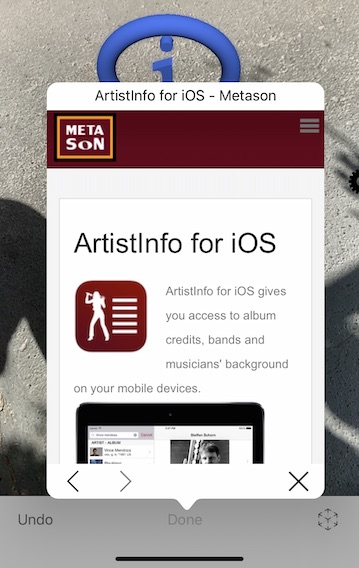
|
Editors and views of enhanced AR items
View Augmented Spaces in AR, 3D, and 2D
View and share as AR, 3D, and 2D
Once you have captured and augmented a room, you can- reopen the space in AR on-site
- experience and share it as 3D view
- view and share it as 2D floor plan
- see and share taken photos as attached documents
- analyze meta data
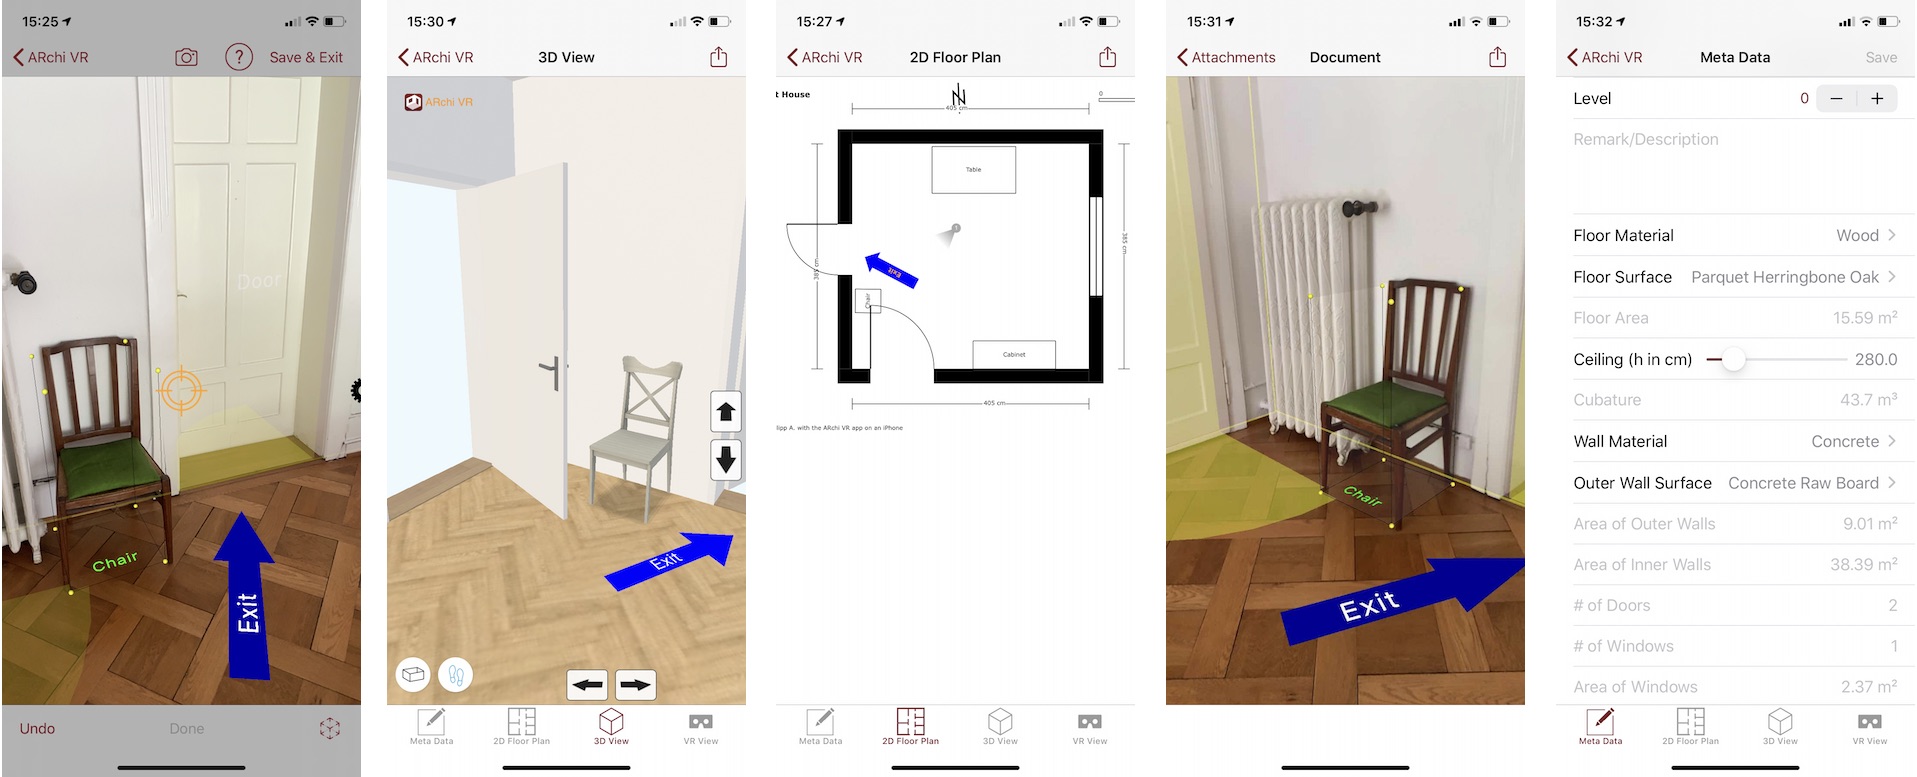
Captured room as AR, as 3D, as 2D floor plan, with attached camera snapshot, and its meta data
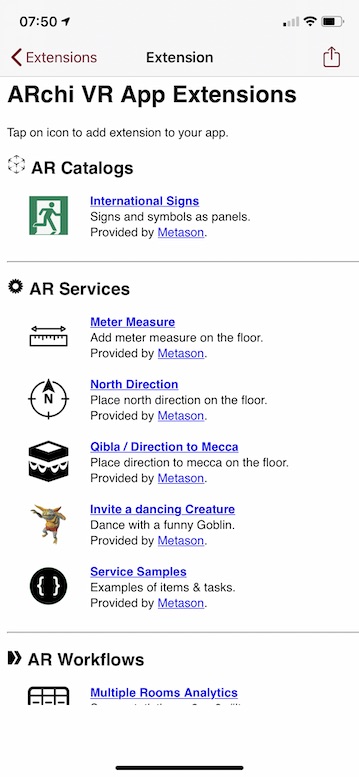
Add Extensions to the ARchi VR App
App Extension Types
The ARchi VR App supports five types of customer-specific App extensions:- Catalog Extension: a 3D model catalog
- Service Extension: a service that a user can select within an AR session to trigger an action
- Workflow Extension: a workflow that is manually or conditionally triggered after saving an AR space
- Curation Extension: a curation that presents a coherent set of Web pages and AR scenes
- Developer Extension: an extension for local on-device implementation of App Extensions

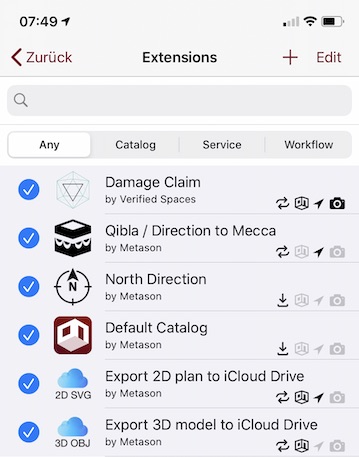
Install App Extensions in Session Defaults
In the Session Defaults view the "App Extensions" entry shows how many extensions are installed in
ARchi
VR on the current iOS device.
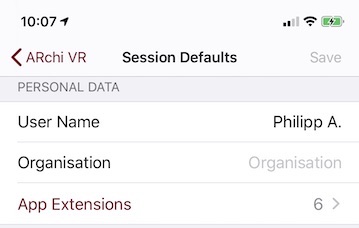
App Extensions in Defaults
- By tapping on an extension entry it can be disabled (without deinstalling). The enabled/disabled status is shown by the checkmark.
- Tap on "Edit" to enable the deinstallation of an extension by wiping from right to left
- Selecting an entry in the "Edit" mode opens a Detail view about the extension provider and what data is transfered concerning data privacy.
- Tap on the "+" button to open a listing of promoted App Extensions. Click on an extension to install it.
Install App Extensions via Universal Link
Universal Links allow users to seamlessly follow links either inside the mobile app or on a website. If a Universal Link is visited on an iOS device it can directly be shown in ARchi VR by the "OPEN" button. Even if ARchi VR is not yet installed, the user may install and open the app from within the Safari Web browser.
Using Universal Links you have great flexibility to distribute your App Extension:- Public: Place the Universal Link for installing an App Extension on a public Internet Web page.
- Private: Embed the Universal Link for installing an App Extension in your Intranet
- Personal: Send the Universal Link for installing an App Extension in an email or message
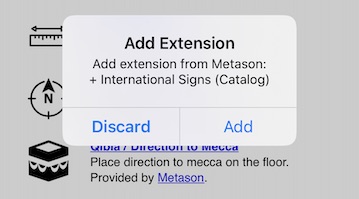
Accept App extension
Declarative AR
ARchi VR App Extensions are technically based on "declarative AR". Instead of using a programming or scripting language to develop an extension by an algorithm that specifies HOW it should work, the "decalarative" approach is focused on specifying WHAT should be done with which object. The declarations of ARchi VR App Extensions are stored in JSON data structures and do not include conventional program code.
List of installed App extensions
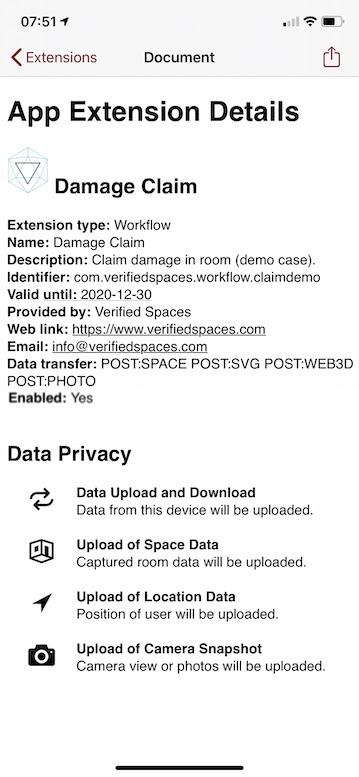
Details of an App extension
List of promoted App extensions
Add Catalog
You can download additional catalogs using App Extensions, for example:The catalog selector presents all elements of all installed and enabled catalog extensions.

Catalog selector
Use AR Services
AR Services
A service extension facilitates adding interactive or animated items to the AR scene. A service can be selected by the user during an AR session by wiping the gear wheel from right to left. A service selector will appear that lists all installed AR services. Select a service for starting its execution.
Example of a Service extension: Another example of a Service extension:
Service selector
Integrate with Workflows
Workflow
A workflow can be manually or conditionally triggered after saving an AR space. You may manually start a workflow in the Meta Data view by tapping the "Workflows..." button and selecting a workflow from the popup menu. A workflow typically sends data to a Web service and returns a link to a document that is added as attachment to the space. This document can be viewed by selecting the "Attachments" button (just above the "Workflows..." button).
The result of a workflow could for example present:- an analysis of the room (floor area, amount of doors, ...)
- a cost estimation (e.g. to repair or maintain equipment).
- an offer to buy added catalog items
- a generated export file
| Icon | Workflow |
|---|---|

|
Export 2D plan to iCloud Drive Save floor plan as 2D SVG file |

|
Export 3D model to iCloud Drive Save 3D OBJ and MTL (Wavefront) files |
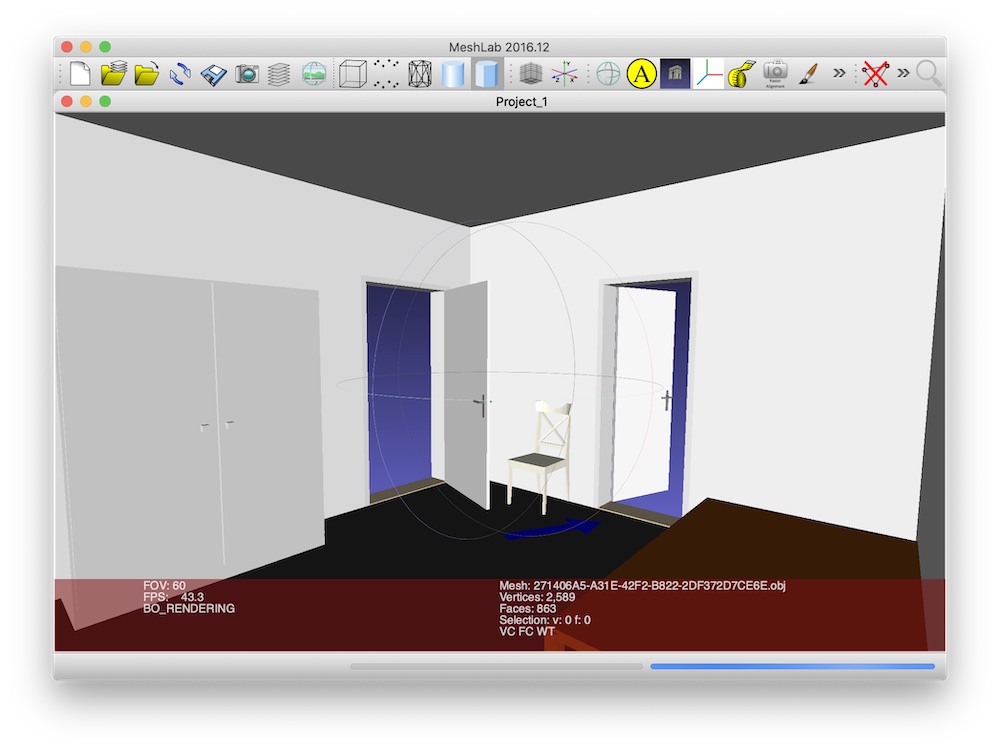
Result of exporting 3D model of a captured room as OBJ/MTL
| Icon | Workflow |
|---|---|

|
Create 3D plan as IFC/BIM file Save Building Information Model (BIM) as IFC file attachment |
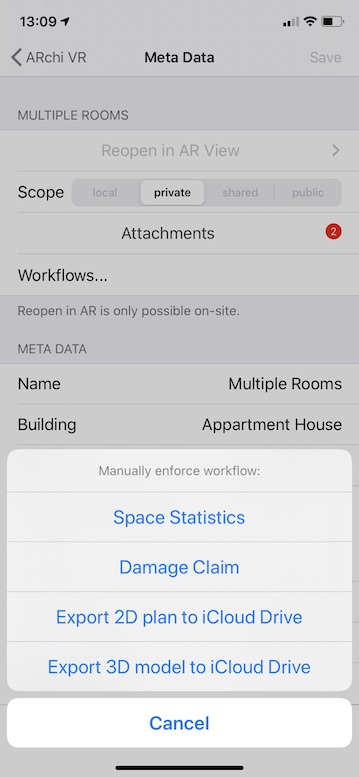
Manually trigger a workflow
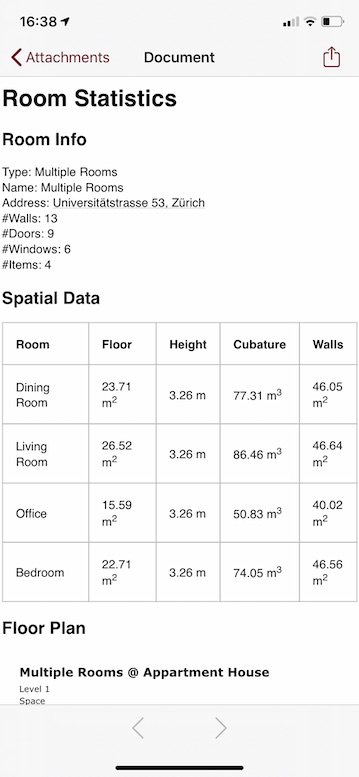
An attachment as a result of a workflow

Explore Curated AR Presentations
Curated AR Presentation
An AR presentation is a set of curated webpages and AR sessions. A user can open curated AR content using universal links provided by registered organizations.
The ARchi VR app comes with a pre-installed AR Curation called "Welcome to ARchi VR":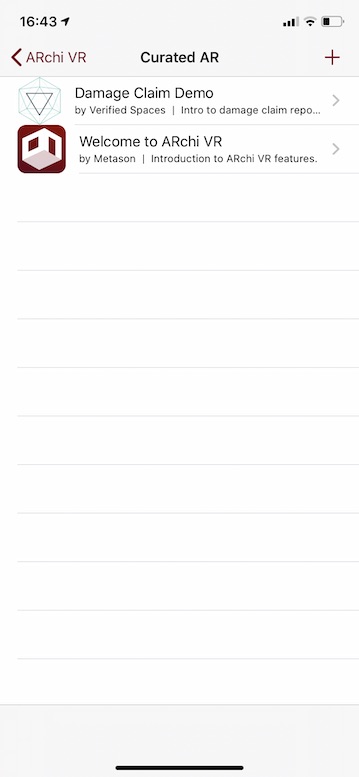
Downloaded AR curations
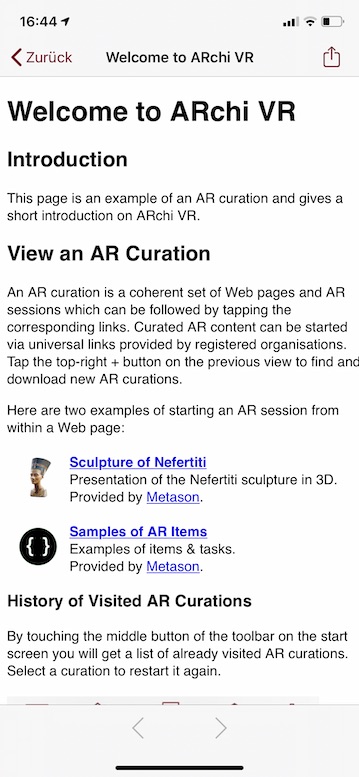
HTML page of a curated AR
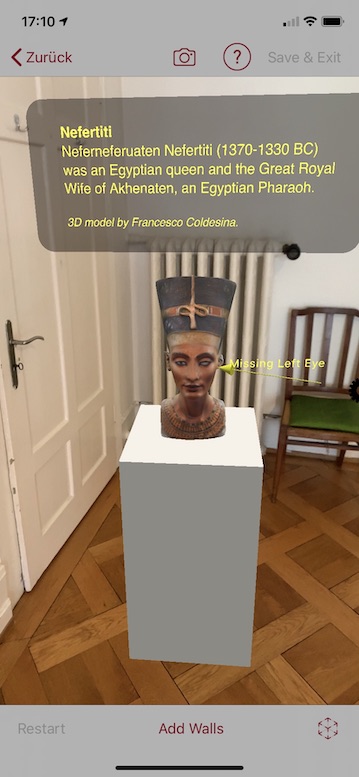
AR view started from HTML page
Develop App Extensions
Create your own App Extensions
The Developer extension enables the creation and on-device testing of extensions via iCloud Drive without needing a Web server.
Find more information in the Technical Documentation on how to develop App Extensions and how to create curated AR content for the ARchi VR App.